
Google offers excellent software to test mobile device management for Android devices through Android Virtual Device (AVD) Manager.
AVD is part of Android Studio and with this software you can virtualize Android devices. You can choose different phone models and decide which Android OS version you want to run. OS versions from 4.0 to 12.0 are available. The software is very suitable to test and validate different kinds of configurations. Some examples are: Application Deployment, Profile settings, Single Sign-On, Per-App-VPN configurations and even Device Compliance. This is great because you do not need all kinds of different physical devices!
Since I’m a VMware EUC enthusiast myself, I’ve been using this tool lately to test Android enrollments and configurations with VMware Workspace ONE UEM.
The installation
Android Studio can be downloaded from the below link. It’s available for Windows, MacOS, Linux and Chrome OS. Since I’m a Windows user myself, this blog will cover the Windows installation.
https://developer.android.com/
The setup is straightforward. It’s really just a next, next, finish installation.

Once Android Studio is installed, you can run the AVD Manager.

If it’s the first time you run AVD, you will be prompted to create a Virtual Device.

I would recommend choosing a Virtual Device that has the Play Store already installed. You can see this from the Play Store icons. If you select one without, you will have to install the G-Apps manually afterward.

Download the Android OS version you would like to use for this hardware model.

Once downloaded, you can launch your virtual device for the first time!

The Hardware Emulator
Before I talk about the Virtual Device itself, I must explain a few things about the different Hardware Emulators. Android Studio can work with different Hardware Emulators for Windows devices, depending which CPU you have on your endpoint device and if you are running the Hyper-V roles.
I found this documentation very useful from Microsoft:
The documentation describes that the following virtualization technologies are available for accelerating the Android emulator on Windows devices: WHPX and HAXM.
- Windows Hypervisor Platform (WHPX) is used when:
- When you are running the Hyper-V roles on your endpoint device.
- When you have an AMD-based CPU.
- Intel’s Hardware Accelerated Execution Manager (HAXM) can only be used when:
- You do not have the Hyper-V roles installed on your endpoint device
- When you have an Intel-based CPU.
For the best experience on Windows, it is recommended that you use WHPX to accelerate the Android emulator. If WHPX is not available on your computer, then HAXM can be used. The Android emulator will automatically make use of hardware acceleration if the following criteria are met:
- Hardware acceleration is available and enabled on your development computer.
- The emulator is running a system image created for an x86-based virtual device.
See the following table for a complete overview:

Switching from WHPX to HAXM
I was running Android Studio with WHPX on my Windows 10 test device, but when I upgraded to Windows 11 I noticed WHPX was no longer working! I saw this was a problem other users were also reporting and the problem is still not solved. You can see the issue here from Google: https://issuetracker.google.com/issues/202188690
Update: The issue seems to be fixed with the 30.9.5 update. You can get the 30.9.5 update for the Emulator with the Visual Studio Android SDK Manager by clicking the gear icon, selecting “Repository” -> “Full List (Unsupported)”. Once you do that, you should see available updates for the Android Emulator component to get from 30.8.4 to 30.9.5.
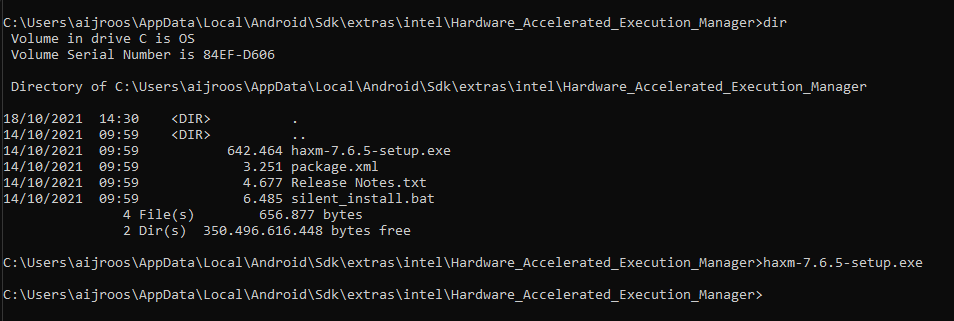
To work around the problem, I decided to switch over to HAXM, since I’m not using Hyper-V anyway. To use HAXM you will have to disable the following roles:


Once I disabled everything Hyper-V related, I could finally run the HAXM installer. The installer is located in the user profile, in %localappdata%\Android\Sdk\extras\intel\Hardware_Accelerated_Execution_Manager
The Virtual Device
The Virtual Device will launch without the first-time setup wizard and you can work with it immediately. In my case, you can go straight to the Play Store and download and configure the Workspace ONE Intelligence Hub.

On the right side of the screen, you see the menu options. From there, you can all kinds of different things, including taking snapshots, which I found quite useful for testing different kinds of configurations. All the other settings will speak for themselves and do not need any explanation.

Company-Owned vs Personally-Owned
The above-mentioned enrollment using WS1 Hub registers the device as Personally-Owned.
Android 11 and newer introduces improved support for work profiles on Company-Owned devices. If a work profile is added from the setup wizard using the provisioning tools added in Android 10, the device is recognized as Company-Owned and a wider range of asset management and device security policies is made available to the device policy controller (DPC). These capabilities enable easier management of both work and personal use on company-owned devices, while maintaining the privacy protections of the work profile.
If a work profile is added to a device using any other method, Android 11 recognizes the device as Personally-Owned. The behavior and features available to work profiles on Personally-Owned devices remains unchanged.
See the following link for more information: https://developer.android.com/work/versions/android-11
What does this mean? Starting from Android 11 you can only register a device as Company-Owned from setup wizard (aka first boot or out of the box experience) using one of the following methods:
- Scanning a QR code
- Using Knox Mobile Enrollment for Samsung devices
- Using Android Zero Touch enrollment for all other Android devices
As I mentioned earlier, the Virtual Device will boot straight into the OS and will not show the first-time setup wizard. In other words, if you want to test Company-Owned device enrollments, you will have to install a Virtual Device with Android 10 or lower. I found the blog from Roch Norwa very useful: https://digitalworkspace.blog/2019/12/28/how-to-virtualize-android-devices-on-macos-and-windows-10/
The steps are as follows:
- Create a Android 10 or lower Virtual Device
- Login with a Google account
- Go to the Play Store and download WS1 Intelligence Hub
- Remove the Google account from the settings menu
- Leave your Virtual Device running
- On your endpoint device, run the following command from %localappdata%\Android\Sdk\platform-tools:
- adb shell dpm set-device-owner com.airwatch.androidagent/com.airwatch.agent.DeviceAdministratorReceiver
If done correctly, note the success message:

You can now enroll your (Android 10 or lower) Virtual Device as COPE.

Please note, in Workspace ONE UEM you will have to set the COPE configuration on your OG.

Conclusion
I think AVD is a great tool to test and validate Workspace ONE UEM settings for Android. However, it has its limitations, such as the mentioned Corpered-Owned device types. I also noticed, that sometimes the AVD is not responsive and I had to wait and be patient or simply reboot the device.
So far, the software is great for me testing Workspace ONE Profile settings, Device Compliancy, VMware Tunnel, Content and Application Deployments. It could be that certain settings from Workspace ONE UEM don’t work on AVD, but for my home lab it’s working as expected so far. Should I run into anything in the future, I will certainly update this blog post!
Special thanks to Mikhail Zuskov for help with creating this blog.


Leave a Reply