

Introduction
Ansible is a radically simple IT automation tool. It handles configuration management, application deployment, cloud provisioning, ad-hoc task execution, network automation, and multi-node orchestration. Ansible makes complex changes like zero-downtime rolling updates with load balancers easy.
VMware has Ansible modules for NSX-T and NSX-T Advanced Load balancer (AVI Networks)
This blog assumes you have some basic knowledge of Ansible and NSX-T. I will not go through the whole process of installing Ansible and NSX-T
This is part 1, where I will start with the basic configuration and AVI Ansible examples.
Part 2 will cover NSX-T Ansible examples.
I am using NSX-T 3.1.2 and AVI 20.1.5.
For Ansible I am using Linux (Ubuntu 18.04 LTS)
Installation of ansible roles
I’ll start with installing NSX-T Ansible roles.
You can find examples, requirements, and installation guides on the GitHub page.
cd ~/.ansible/roles
git clone https://github.com/vmware/ansible-for-nsxt.git
Next up AVI Ansible roles.
You can find examples, requirements, and installation guides on the GitHub page.
pip install avisdk --upgradeYou can use ansible-galaxy to install the roles.
ansible-galaxy install -f avinetworks.avisdkOr you can do a git clone.
cd ~/.ansible/roles
https://github.com/avinetworks/ansible-role-avisdk.git
mv ansible-role-avisdk avinetworks.avisdk
Logical overview
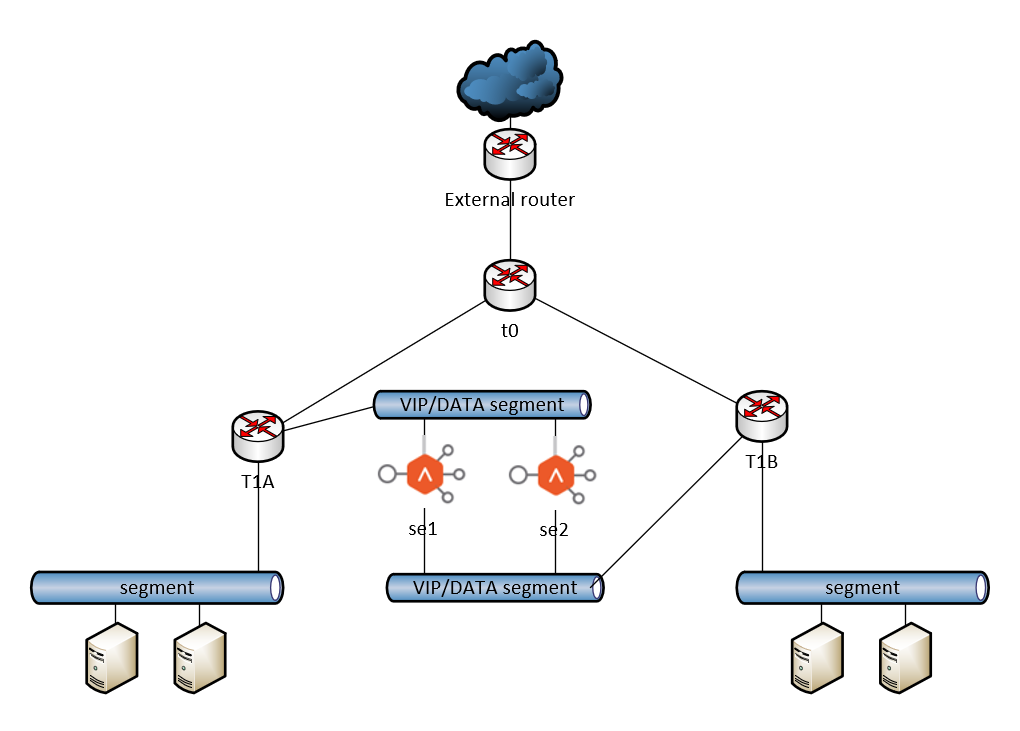
Let me describe how I have set up NSX-T and AVI.
The setup is pretty straightforward. I am using AVI on a separate segment. Each T1 represents a ‘customer’. For each customer, I create a separate VRF on AVI. AVI uses NSX-T cloud. Because of this, AVI will automatically create a static route on the T1 pointing to the correct AVI SE. More about this later.
Basic Setup
I will describe some small basics that are needed for NSX-T and AVI to work.
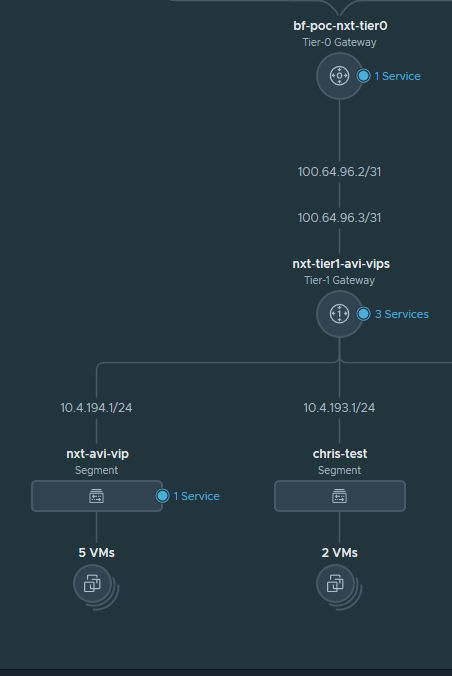
I am using the following networks
| Network Name (Segment) | Ip subnet | T1 router | dhcp | Description |
| nxt-se-mgmt | 10.4.192.0/24 | nxt-tier1-mgmt | YES | AVI SE mgmt segment |
| nxt-avi-vip | 10.4.194.0/24 | nxt-tier1-avi-vips | YES | AVI VIP segment |
| chris-test | 10.4.193.0/24 | nxt-tier1-avi-vips | no | Here are my webservers |
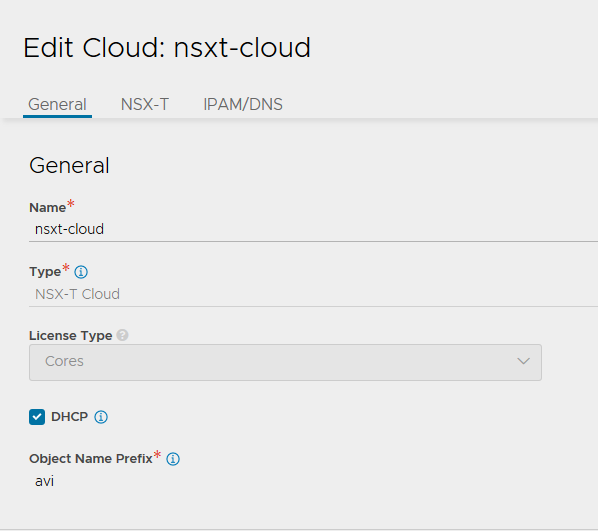
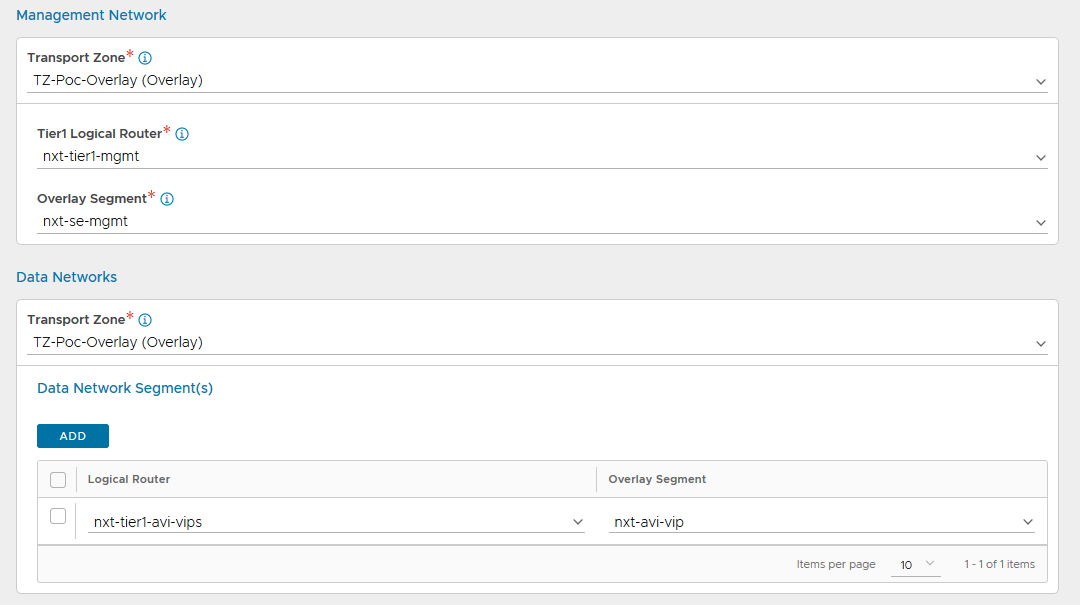
In AVI I enabled DHCP on the NSX-T cloud.
DHCP needs to be configured in NSX-T, on both nxt-se-mgmt and nxt-avi-vip segments.
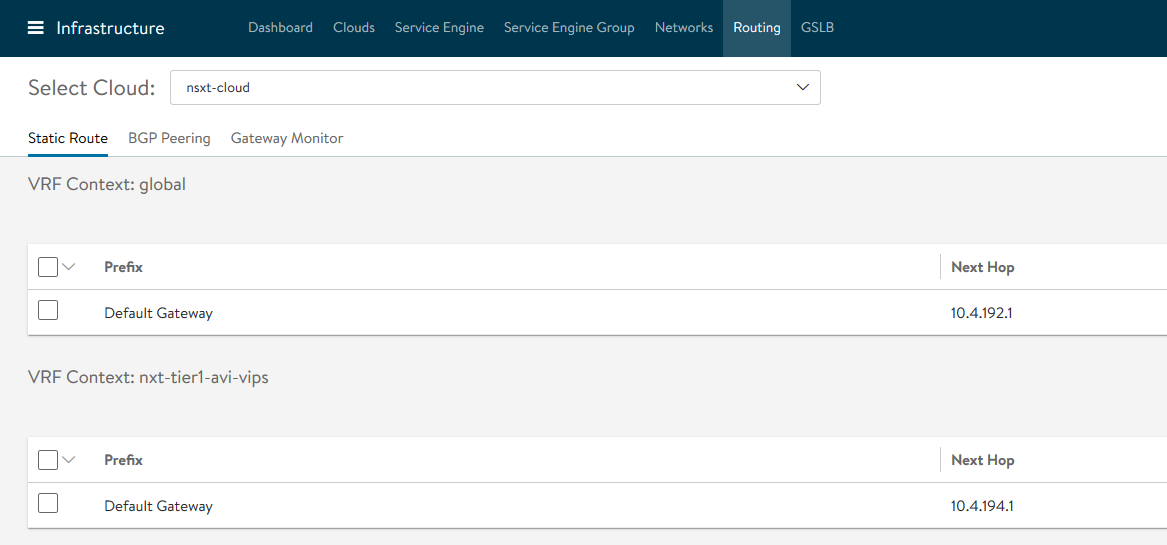
The next step is to enable routing on the VRF in AVI.
The routing is needed for AVI VRF to know where to send the traffic. The next-hop IP is configured on the corresponding T1.
Lets test ansible
Let the fun begin 🙂 Let’s create our first health monitor and pool.
I am using a var file with all the definitions I need. The file is named ‘build_lb_vars.yml’
{
        "avi_controller": "10.0.0.35",
        "avi_username": "admin",
        "avi_password": "VMware1!VMware1!",
        "avi_api_version": "20.1.5",
        "avi_cloud_id": "nsxt-cloud",
        "state": "present",
        "persistence_name": "System-Persistence-Client-IP",
        "httpprofile_name": "System-HTTP",
        "avi_vips": [
                {
                        "vs_name": "pocvip1",
                        "vs_ip": "10.10.10.10",
                        "pool_name": "sddc01-vs02-pool01",
                        "service_ports": [
                           {
                           "port": "443"
                           },
                           {
                           "port": "80"
                           },
                        ],
                },
        ],
        "avi_pools": [
                {
                       "pool_name": "sddc01-vs02-pool01",
                       "healthmonitor_name": "sddc01-vs02-hm01",
                       "pool_members": [
                               {
                                       "ip": { "addr": 10.4.193.20, "type": V4 },
                                       "hostname": "web01",
                               },
                               {
                                       "ip": { "addr": 10.4.193.21, "type": V4 },
                                       "hostname": "web02",
                               },
                       ]
                }
       ],
       "health_monitors": [
                {
                        "healthmonitor_name": "sddc01-vs02-hm01",
                        "healthmonitor_type": "HEALTH_MONITOR_HTTP"
                },
       ]
}
Ansible code to create the health monitor. The file is named ’06_create_health_monitor.yml’
---
- hosts: localhost
  become: no
  vars_files:
    - build_lb_vars.yml
  roles:
    - role: "avinetworks.avisdk"
  tasks:
    - name: Create HTTP Health Monitor
      avi_healthmonitor:
        controller: "{{ avi_controller }}"
        username: "{{ avi_username }}"
        password: "{{ avi_password }}"
        api_version: "{{avi_api_version}}"
        state: "{{ state}}"
        name: "{{ item.healthmonitor_name }}"
        http_monitor:
          http_request: 'HEAD / HTTP/1.0'
          http_response_code:
            - HTTP_2XX
            - HTTP_3XX
        receive_timeout: 4
        failed_checks: 3
        send_interval: 10
        successful_checks: 3
        is_federated: false
        type: "{{ item.healthmonitor_type }}"
      with_items:
        - "{{ health_monitors }}"
Ansible code for creating the pool. The file is named ’07_create_pool.yml’
---
- hosts: localhost
  become: no
  vars_files:
    - build_lb_vars.yml
  roles:
    - role: "avinetworks.avisdk"
  tasks:
     - name: Create local load balancing pool
       avi_pool:
        controller: "{{ avi_controller }}"
        username: "{{ avi_username }}"
        password: "{{ avi_password }}"
        api_version: "{{avi_api_version}}"
        state: "{{ state}}"
        name: "{{ item.pool_name }}"
        tenant_ref: /api/tenant/?name=admin
        cloud_ref: '/api/cloud/?name={{ avi_cloud_id }}'
        tier1_lr: nxt-tier1-avi-vips
        application_persistence_profile_ref: '/api/applicationpersistenceprofile?name={{ persistence_name }}'
        health_monitor_refs:
          - '/api/healthmonitor?name={{ item.healthmonitor_name }}'
        lb_algorithm: LB_ALGORITHM_LEAST_CONNECTIONS
        servers: "{{ item.pool_members }}"
       with_items:
         - "{{ avi_pools }}"
Ansible code for creating the VIP. I use two files here. One for creating the VSVIP and one for the Virtual Service. The files are named 08a_create_vip.yml and 08b_create_vip.yml
---
- hosts: localhost
  become: no
  vars_files:
    - build_lb_vars.yml
  roles:
    - role: "avinetworks.avisdk"
  tasks:
     - name: Create vsvip
       avi_vsvip:
        controller: "{{ avi_controller }}"
        username: "{{ avi_username }}"
        password: "{{ avi_password }}"
        api_version: "{{avi_api_version}}"
        state: "{{ state}}"
        name: "{{ item.vs_name }}"
        tenant_ref: /api/tenant/?name=admin
        cloud_ref: '/api/cloud/?name={{ avi_cloud_id }}'
        tier1_lr: nxt-tier1-avi-vips
        vip:
          - vip_id: 1
            avi_allocated_fip: true
            auto_allocate_ip: true
            enabled: true
            auto_allocate_floating_ip: true
            avi_allocated_vip: true
            auto_allocate_ip_type: V4_ONLY
            ip_address:
              addr: "{{item.vs_ip }}"
              type: V4
       with_items:
        - "{{ avi_vips }}"
---
- hosts: localhost
  become: no
  vars_files:
    - build_lb_vars.yml
  roles:
    - role: "avinetworks.avisdk"
  tasks:
     - name: Create virtualservice
       avi_virtualservice:
        controller: "{{ avi_controller }}"
        username: "{{ avi_username }}"
        password: "{{ avi_password }}"
        api_version: "{{avi_api_version}}"
        state: "{{ state}}"
        name: "{{ item.vs_name }}"
        performance_limits:
          max_concurrent_connections: 1000
        application_profile_ref: '/api/applicationprofile?name={{ httpprofile_name }}'
        services: "{{ item.service_ports }}"
        pool_ref: '/api/pool?name={{ item.pool_name }}'
        vsvip_ref: '/api/vsvip/?name={{ item.vs_name }}'
        tenant_ref: /api/tenant/?name=admin
        cloud_ref: '/api/cloud/?name={{ avi_cloud_id }}'
       with_items:
         - "{{ avi_vips }}"
Running the code:
$ ansible-playbook 08a_create_vip.yml 08b_create_vip.yml

PLAY [localhost] **************************************************************************************************

TASK [Gathering Facts] **************************************************************************************************
ok: [localhost]

TASK [avinetworks.avisdk : Check ansible version] **************************************************************************************************
skipping: [localhost]

TASK [Create vsvip] **************************************************************************************************
changed: [localhost] => (item={'vs_name': 'pocvip1', 'vs_ip': '10.10.10.10', 'pool_name': 'sddc01-vs02-pool01', 'service_ports': [{'port': '443'}, {'port': '80'}]})

PLAY RECAP **************************************************************************************************
localhost                  : ok=2    changed=1    unreachable=0    failed=0    skipped=1    rescued=0    ignored=0


PLAY [localhost] **************************************************************************************************

TASK [Gathering Facts] **************************************************************************************************
ok: [localhost]

TASK [avinetworks.avisdk : Check ansible version] **************************************************************************************************
skipping: [localhost]

TASK [Create virtualservice] **************************************************************************************************
changed: [localhost] => (item={'vs_name': 'pocvip1', 'vs_ip': '10.10.10.10', 'pool_name': 'sddc01-vs02-pool01', 'service_ports': [{'port': '443'}, {'port': '80'}]})

PLAY RECAP **************************************************************************************************
localhost                  : ok=4    changed=2    unreachable=0    failed=0    skipped=2    rescued=0    ignored=0
Verify the settings
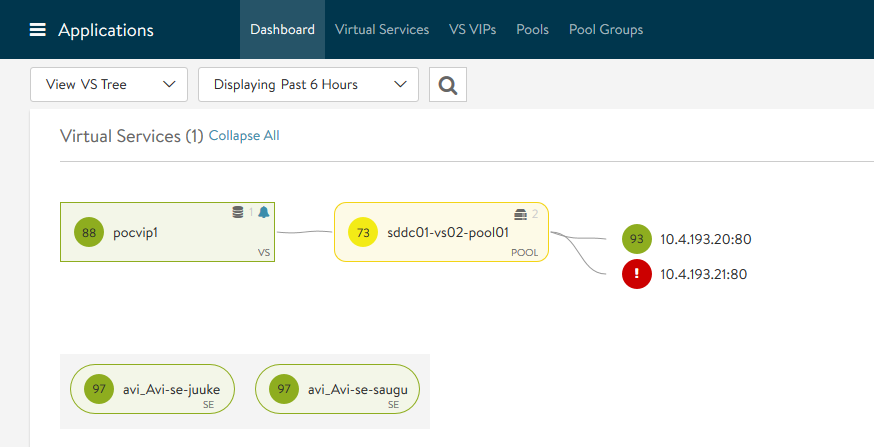
In AVI it will look like this
On NSX-T edge the route will show up as a t1l (T1 Load balancer)
On the T1-SR it has 2 next-hops (I am using 2 AVI SE)
T0-SR
Total number of routes: 1

t1l> * 10.10.10.10/32 [3/0] via 100.64.96.3, downlink-299, 01:54:21

T1-SR
10.10.10.10/32     10.4.194.18                route       14cf6c93-72e1-400f-98f7-b43b26354852
                   10.4.194.45                            14cf6c93-72e1-400f-98f7-b43b26354852
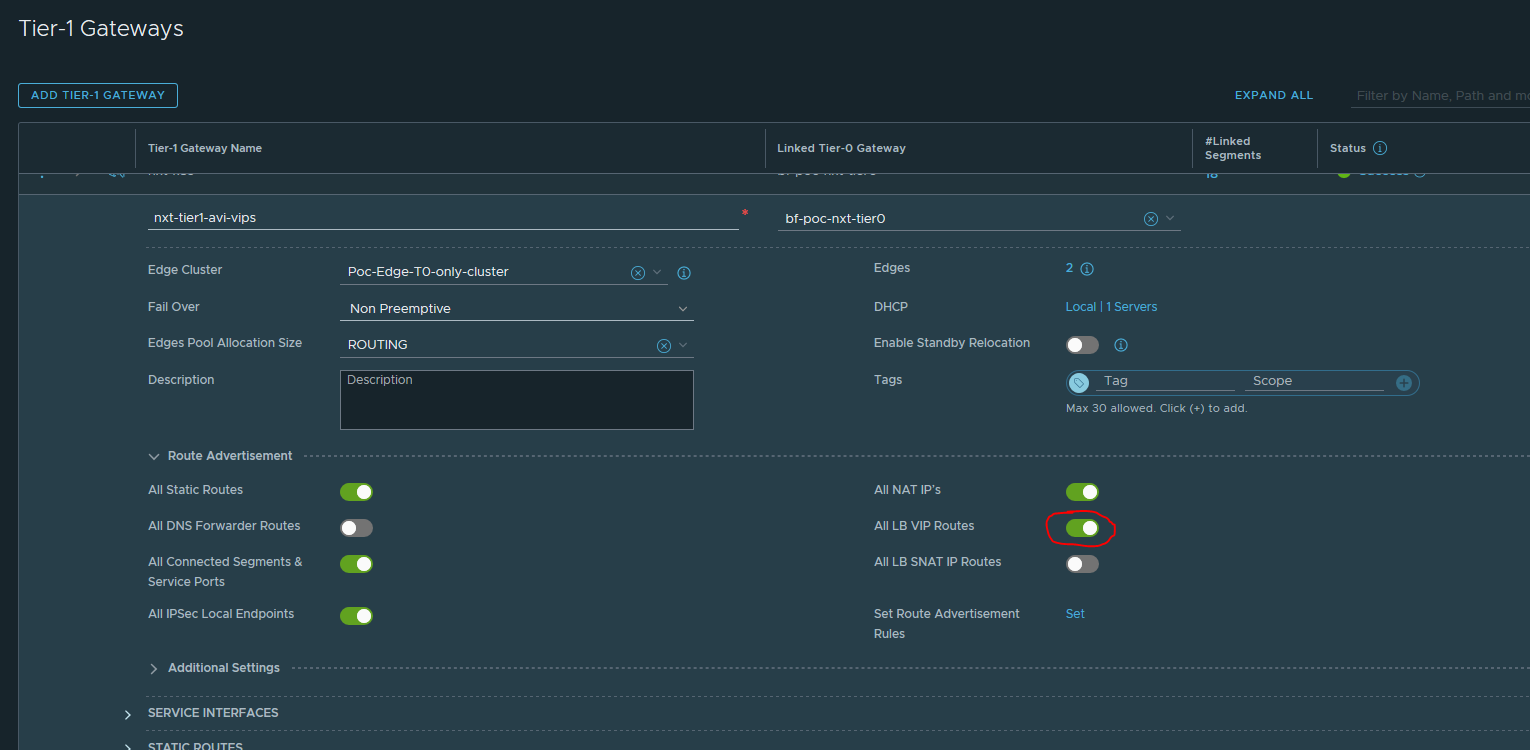
Do not forget to enable T1 All LB VIP Routes in the Route Advertisement
Conclusion
That concludes part 1.
As expected it works very well.
I do have a hard time understanding why, when not using DHCP, the mgmt SE IP assignment works fine, but not the VIP IP assignment. If you have any thoughts or suggestions on this, please let me know in the comments!


Leave a Reply